Showing posts with label fabric. Show all posts

Sunday, 27 October 2013

Wool Owls and a tutorial / Hiboux d'automne et un tutoriel


Finally, I am back in my studio, and to start the new sewing season, I worked on a very easy project perfect for fall.  I don't know why it is, but owls are a symbol of fall to me, and paired with cozy wool plaids, it looked like a match made in heaven.

Enfin, je suis de retour dans mon atelier, et pour commencer ma nouvelle saison de couture, j'ai travaillé sur un petit projet facile parfait pour l'automne.  Je ne sais pourquoi, mais dans ma tête, les hiboux représentent l'automne, d'autant plus s'ils sont jumelés à des beaux tissus de laine à carreaux. 

The project I made is nothing new, but I thought a little tutorial might still be useful to some of you.  If you do make an owl - or a whole lot of them - I would be very happy if you would send me a link to your creation in the comments.

Le projet que j'ai réalisé n'est rien de nouveau, mais j'ai pensé qu'un petit tutoriel pourrait quand même être utile à certaines d'entre vous.  Et si vous vous lancez dans la confection d'un hibou - ou de toute une collection d'oiseaux - je serais très heureuse que vous ajoutiez un lien vers vos créations dans les commentaires.

Material (for one owl measuring about 3" X3")

- A scrap piece of wool (felted or not) at least 7" X 6".  Other materials like velvet or denim would be great as well.
- A scrap of coordinating cotton about 3" X 3"
- The templates included at the end of this post and a small piece of cardboard.
- Two buttons about 5/8" in diameter for the eyes
- Coordinating embroidery thread
- And the usual: scissors, needle, pins, thread, sewing machine, iron (a mini iron if you have one).

Matériel (pour un hibou d'environ 8 cm X 8 cm)

- Un morceau de laine (feutrée ou non) d'au moins 18 cm X 16 cm.  D'autres matières comme le velours ou le denim pourraient aussi très bien faire.
- Un morceau de coton coordonné d'environ 8 cm X 8 cm
- Le patron inclus à la fin de cet article et un bout de carton
- Deux boutons d'environ 1.5 cm de diamètre pour les yeux
- Du fil à broder agencé aux couleurs de la laine
- Et l'habituel: ciseaux, aiguille, épingles, fil à coudre, machine à coudre, fer à repasser (un mini fer si vous en avez un).

Step 1
Print the template on a letter size (8 1/2" X 11") paper sheet.  The measurement I noted inside the egg-shaped piece are only there so you can check that your printed template is the same size as mine.
Cut out both pieces.
The biggest piece will be the body of your owl.
The smaller piece will be the belly, and it will be easier to use if you trace it on cardboard because paper is not sturdy enough to work well.

Étape 1
Imprimer le patron sur une feuille de papier de format lettre.  Les mesures que j'ai notées à l'intérieur de la pièce qui ressemble à un oeuf sont seulement à titre indicatif, pour que vous puissiez vérifier que votre patron est de la même grandeur que celui que j'ai utilisé.
Découper les deux morceaux.
Le plus grand morceau, en forme d'oeuf, formera le corps du hibou.
Le plus petit morcerau servira de plastron, et il sera plus facile à utiliser si on le retrace sur un morceau de carton, parce que le papier n'est pas suffisamment rigide.

Step 2
Pin the body template to your wool scrap and cut around it.  No need to add seam allowances, they are already included in the template.

Étape 2
Épingler le patron du corps sur le morceau de laine et découper tout autour.  Nul besoin d'ajouter les valeurs de couture, elles sont incluses dans le patron.


Step 3
Repeat step 2 to have two identical pieces.

Étape 3
Répéter l'étape 2 pour obtenir deux morceaux identiques.


Step 4
Match both pieces wrong side out and pin in place.

Étape 4
Aligner les deux morceaux l'un sur l'autre, endroit contre endroit, et épingler en place.


Step 5
Sew all around your two pieces.  No need to leave an opening, we will use an easier - and lazier - technique.

Étape 5
Coudre tout autour des deux morceaux.  Pas besoin de laisser une ouverture, nous utiliserons plutôt une technique plus simple et plus rapide.


Step 6
Separate the two layers between your fingers by pinching one of them, and with the point of your scissors, make a vertical cut no longer than 1 1/2" long.

Étape 6
Séparer les deux épaisseurs entre les doigts en pinçant l'une d'elles, et avec la pointe des ciseaux, pratiquer une entaille verticale qui ne dépasse pas 4 cm de long.


Step 7
Through this opening, turn your owl inside out.  The side that has the opening will be the front of your owl.

Étape 7
Par cette ouverture, retourner le hibou pour que l'endroit soit à l'extérieur.  Le côté de l'entaille sera le devant du hibou.


Step 8
Now move on to the cardboard template.  Place it on the wrong side of your scrap of cotton in a way that you have about 3/8" extra fabric on each side.  Roughly draw a line around the template as I did in the picture below, and then cut on this line.

Étape 8
Utiliser maintenant le patron qui a été reporté sur du carton et le placer sur l'envers du morceau de coton, de façon à ce qu'il y ait un extra d'environ 1 cm tout autour.  Tracer une ligne à main levée autour du patron, comme je l'ai fait dans la photo qui suit, et découper sur cette ligne.


Step 9
With your iron, or mini iron if you have one, fold the extra fabric over the cardboard template and press in place, then take the cardboard out.

Étape 9
Avec votre fer à repasser, ou mini fer si vous en avez un, replier le tissu sur le patron en carton et pressez en place.  Retirer ensuite le morceau de carton.


Step 10
Place your piece of cotton, with the fold hidden inside, on the body piece, making sure to cover the cut from which you turned it inside out, and pin in place.

Étape 10
Placer le morceau de coton, avec le repli caché en dessous, sur le morceau du corps du hibou, en s'assurant de bien recouvrir l'entaille par laquelle le hibou avait été retourné.  Épingler en place.


Step 11
With a needle and thread, blind-stitch the cotton piece in place.

Étape 11
Avec une aiguille et du fil, fixer au point invisible.


Step 12
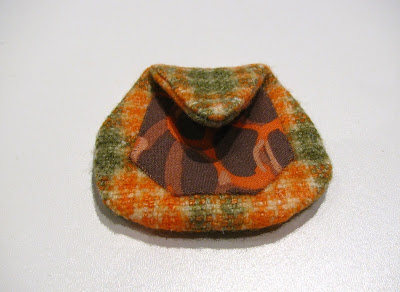
Fold the upper point of the wool piece over the belly part, to form the head of the owl.  Press in place with your iron.

Étape 12
Replier la partie supérieure en pointe par-dessus le plastron en coton, de manière à former la tête du hibou.  Presser en place avec le fer à repasser.


Step 13
With embroidery thread, join the point to the belly.  This will be the bill of the owl.  Then, sew buttons in place for the eyes, and meet your new friend.

Étape 13
Au moyen de fil à broder, fixer la pointe au plastron, de manière à former un bec.  Coudre ensuite les boutons en guise d'yeux, et il ne vous reste plus qu'à faire connaissance avec votre nouvel ami.


You can make as many owls as you want and have a whole family of them.  To make a garland like I did in my top picture, simply thread a twine in the top fold of each owl and attach it to your wall.

Vous pouvez fabriquer autant de petits hiboux qu'il vous plaira et en avoir une famille complète!  Pour en faire une guirlande comme j'ai fait dans ma photo du début, il vous suffira d'insérer une ficelle sous le pli au sommet de la tête de chaque hibou, et d'en attacher les extrémités à un mur.


Below is the template that I used to make my owls.  I can't explain why it appears grey when  my paper sheet was white, but it seems like this is the best I can do for now...  You may want to save the image to your computer and then print it on letter-size paper.  The dimensions are there so you can check that your printed template is the same size as mine.  Of course, you can enlarge it if you want, but then the quantity of fabric needed will be greater than what I gave in the material list.

Voici  le patron que j'ai utilisé pour fabriquer mes hiboux.  Je ne m'explique pas comment l'image peut apparaître grise alors que ma feuille de papier était blanche, mais il semble que ce soit le mieux que je puisse faire pour le moment...  Il serait sans doute préférable de sauvegarder l'image sur votre ordinateur avant de l'imprimer sur du papier de format lettre.  Les mesures sont indiquées pour que vous puissiez vérifier que votre patron une fois imprimé a les mêmes dimensions que le mien.  Bien sûr, rien ne vous empêche de l'agrandir si vous le voulez, mais dans ce cas rappelez-vous que vous aurez besoin de plus de tissu que ce que j'ai noté dans la liste de matériel.


Have fun making owls and don't forget to show them to me in the comments!

Amusez-vous bien à fabriquer des petits hiboux, et n'oubliez pas de me les montrer dans les commentaires!

Monday, 1 April 2013

My first Quilt / Mon premier quilt


I can't believe that I have - finally - finished my first quilt.  I started it three years ago, and it remained unfinished for a very long time, but last week I got tired of seeing it sitting there waiting, so I decided it was time to put an end to it.  All that remained was to sew the binding on, so it wasn't long to do, and now I am very happy with the final result.

Je n'arrive pas à croire que j'ai terminé mon premier quilt - enfin!  Je l'avais commencé il y a trois ans, et je l'avais laissé en plan pendant de longs mois, mais la semaine dernière je n'en pouvais plus de le voir là, plié sur une chaise en attente d'être terminé, alors je m'y suis remise.  Il ne restait en fait qu'à ajouter la bordure finale, alors ça n'a pas été très long, et je suis très contente du résultat final.


One of the steps that took me a very long time was choosing the backing fabric, which is Valori Wells Del Hi Pom Pom.  The other step that took me forever was the quilting.  I had no idea how to do it, so I finally opted for knotting it on the back.

L'une des étapes qui m'a pris beaucoup de temps, c'était de choisir le tissu pour l'endos, qui s'appelle Del Hi Pom Pom, par Valori Wells.  L'autre étape qui a retarté la complétion est le piquage.  Je n'avais aucune idée comment m'y prendre, et j'ai finalement décidé de faire des centaines de noeuds sur l'envers.


The funny thing is that I don't really need this quilt, and I don't know where I will use it in the house, so for the moment it is back sitting pretty on a chair.

Le plus drôle, c'est que je n'ai pas vraiment besoin de ce quilt, et je ne sais pas quel sera son usage dans la maison, alors pour le moment il attend patiemment sur une chaise.


Wednesday, 31 October 2012

Floral Fabric / Tissus fleuris

Dark florals
Light florals

I like to use floral fabrics in my sewing projects, and I usually go for very small flowers because they are often better suited to the small items I make, and also because they are just so darn cute.  However, I am attracted to larger designs as well, and I had fun the other day selecting my favorites, first in dark colors, then in lighter ones.  In case anything catches your eye, all these fabrics were found on Hawthorne Threads and I have included a legend for reference.

J'aime bien utiliser des tissus à motifs floraux dans mes projets de couture, et j'opte généralement pour de très petites fleurs parce qu'elles sont généralement mieux mises en valeur dans les petits objets que je fabrique, et aussi parce que je les trouve tout simplement trop mignonnes.  Cependant, je suis aussi attirée par les motifs plus grands, et je me suis amusée il y a quelques jours à sélectionner mes préférés, d'abord dans des teintes foncées, et ensuite dans des teintes plus claires.  Et juste au cas ou l'un de ces motifs attirerait votre oeil, tous ces tissus sont tirés de Hawthorne Threads et j'ai aussi inclus une légende pour référence.


Dark floral legend / Légende des fleuris foncés

1. Floral Couture in pitch by Amy Butler
2. Anastasia in red by Alexander Henry
3. Trailing Orchid in blue by Amy Butler
4. Hope Chest in olive by Josephine Kimberling
5. Acqua di rose in jade by Art Gallery
6. Rose patch in dinner by Anna Maria Horner
7. White Peonies in iris by Lida Enche
8. Bespoken fashion mood in intense by Patricia Bravo
9. Gypsy vine in indigo by Laura Gunn
10. Modernology fashionable in azure by Patricia Bravo
11. Apple of my eye in red by Riley Blake
12. Paradise pond in twilight by Patricia Bravo

Light floral legend / Légende des fleuris clairs

1. Freshcut Mums in blue by Heather Bailey
2. Spring Promise Country Garden in yellow by Ana Davis
3. Lilly Belle Garden Rocket in turquoise by Bari J Ackerman
4. Magic Garden, Garden Poetry in green by Sabine Reinhart
5. Magnolia Branch in aqua by Laura Gunn
6. Freshcut Peony in turquoise by Heather Bailey
7. Heirloom Rose bouquet in sky by Joel Dewberry
8. Night Tree in cilantro by Amy Butler
9. Bliss bouquet in teal by Amy Butler
10. Eloise in caledon by Jennifer Paganelli
11. Twilight Peony in Safron by Amy Butler
12. Dainty Blossoms floral in green by Carina Gardner

Sunday, 1 April 2012

Spring Top / Blouse printannière


I have been sewing for a few years now, but for some reason I was afraid to make clothes.  I was sure it would never fit me well and that I would end up not wearing what I'd made.  This little top, from the pattern by MadebyRae, had been on my project list for a couple of years, and I also had the fabric waiting in my stash all that time, but I kept putting it off.

Je m'adonne à la couture depuis quelques années déjà, mais j'ai toujours eu peur de me lancer dans la confection de vêtements.  Je craignais de ne pas arriver à bien les ajuster et d'en être déçue au point de ne pas porter mes confections.  Ce petit haut, d'après un patron de MadebyRae, était sur ma liste de projets à faire depuis environ deux ans, et j'avais même le tissu que je gardais en réserve depuis tout ce temps.  Et malgré tout, je remettais sans cesse le projet à plus tard.


 I finally took the plunge a couple of weeks ago and I am very pleased with how it turned out.  And I will definitely wear it when the temperatures get warmer.  I am also thinking about going for a skirt or a dress next.

Je me suis enfin lancée il y a quelques semaines, et je suis tout compte fait très satisfaite du résultat.  Et je vais sans contredit le porter dès que les températures le permettront.


There was a lot of fussing when it was time to adjust the straps, so if I were to do it again, I would invite a friend over or at least wait for a day when Patrick is around.  Pinning stuff in your own back is not an easy task!

J'ai eu un peu de mal au moment d'ajuster les bretelles, donc si c'était à refaire, j'inviterais une amie pour m'aider, ou du moins j'attendrais un jour ou Patrick est à la maison pour me donner un coup de main.  Épingler un vêtement dans son propre dos n'est pas chose facile!

Tuesday, 24 January 2012

Open and Press / Ouvrir et presser

Don’t you just love it when you find a new tool that simplifies your life?  That is what happened with the little Clover mini iron that I got for Christmas.

N’est-ce pas génial quand on découvre un nouvel outil pour nous simplifier la vie?  C’est ce qui m’est arrivé avec le fer à repasser miniature Clover que j’ai reçu pour Noël.


I tried it last week and it was a revelation.  I had some very small scraps of fabrics to piece together and needed to open all my seams as I went.  Because my scraps are very small and because I wanted to make the best of them, I reduced my seams to less than ¼” on most pieces, and I usually find it very difficult to press them open with my regular iron.  The mini iron worked like a charm and saved my fingers from the usual burns.

Je l’ai essayé la semaine dernière et j’ai eu une révélation.  J’avais de tous petits morceaux de tissu à assembler et il me fallait ouvrir chaque couture à mesure que j’avançais.  Parce que mes morceaux de tissus étaient très petits et parce que je voulais pouvoir conserver la plus grande partie des motifs, j’ai réduit mes coutures en deçà du quart de pouce habituel.  J’ai souvent du mal à presser d’aussi étroites coutures avec mon fer à repasser régulier.  Le fer miniature s’est avéré être l’outil idéal pour le faire et il m’a évité les brûlures aux doigts que je m’inflige trop souvent.


I had some doubts about the temperature that it could reach, and whether it would be enough to easily press seams, but I was impressed.  There are two different settings for the temperature.  I only tried the one for cotton, the other one is for more delicate fabrics.

J’avais au préalable quelques doutes sur le degré de température que ce petit fer pouvait atteindre.  Je craignais que la température ne soit pas assez élevée pour aisément aplatir les coutures, et j’avoue que j’ai été impressionnée.  Il y a deux réglages de température sur ce fer.  J’ai essayé seulement la plus élevée qui convient au coton, l’autre servant aux tissus plus délicats.


So, if you do lots of patchworks with small pieces, I am certain that this mini iron would be a great addition to your quilting toolbox.

En bref, si vous êtes de celles qui s’adonnent régulièrement à l’assemblage de petits morceaux, je suis convaincue qu’un fer miniature serait un atout dans votre trousse d’accessoires.

As to what these mini patchworks are destined to, you will have to wait a few days before I show you the final result.  Any guesses?

Et pour ce qui est de ces mini patchworks, vous devrez attendre quelques jours avant de voir leur usage final.  Vous voulez deviner?


Sunday, 22 January 2012

New Fabrics and Favorite Music / Nouveaux tissus et musique préférée


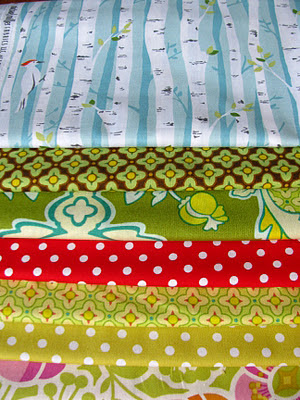
Hello everyone!  I hope you are having a great weekend.  I am making a quick stop here to show you the new fabrics that I got  last week.  I felt like I needed a splash of colors to brighten up the coldest days of the winter.  From top to bottom they are:
- Birch Forest in Aqua from Backyard Baby by Patty Sloniger
- Tiled Primrose in Brown from Bijoux by Heather Bailey
- Pineapple Brocade in Celery from Bijoux by Heather Bailey
- Dumb Dot in Red by Michael Miller
- Tiled Primrose in Celery from Bijoux by Heather Bailey
- Dumb Dot in Citron by Michael Miller
- Sophie's Garden in Orange from Wildwood by Erin McMorris

Bonjour à toutes!  J'espère que votre fin de semaine se déroule bien.  Je viens faire un petit tour ici aujourd'hui pour vous montrer les nouveaux tissus que j'ai reçus la semaine dernière.  J'avais besoin de belles couleurs vibrantes pour égayer les journées les plus froides de l'hiver.  De haut en bas, les voici:
- Birch Forest en aqua, de la collection Backyard Baby par Patty Sloniger
- Tiled Primrose en brun, de la collection Bijoux de Heather Bailey
- Pineapple Brocade en céleri, de la collection Bijoux de Heather Bailey
- Dumb Dot en rouge par Michael Miller
- Tiled Primrose en céleri, de la collecton Bijoux par Heather Bailey
- Dumb Dot en citron par Michael Miller
- Sophie's Garden en orangé, de la collection Wildwood par Erin McMorris

Because it is the weekend and we all need some good music to relax, I am leaving you with two of my favorite songs at the moment.  The first one is called Adieu and is the first single from Blonde, the new album  by Coeur de Pirate.

Parce que c'est le week-end et parce qu'on a tous besoin de bonne musique pour relaxer, je vous laisse avec deux de mes chansons favorites ces jours-ci.  La première s'appelle Adieu et est le premier extrait du nouvel album de Coeur de Pirate titré Blonde.


The second one is the new song Somebody Somewhere from Dallas Smith, former singer of Default, who is now trying a solo career in country music.

La deuxième s'intitule Somebody Somewhere.  C'est le premier extrait de Dallas Smith en solo qui fait une incursion dans la musique country après avoir laissé le groupe Default dont il était le chanteur.


I wish you all a great Sunday and I will be back during the week with news from my studio.

Profitez bien de votre dimanche et je vous reviendrai pendant la semaine avec des nouvelles de mon studio.

Thursday, 4 August 2011

Summer Sewing Project / Projet de couture estival


I finished this little project a few days ago.  That was all the sewing I did during my vacation, a little mug rug in English Paper Piecing.  I made it slowly, sitting in the sun on the deck in the morning, or in the shade in the afternoon, usually with my cat friend Gazou lounging near me.


J'ai terminé ce petit projet il y a quelques jours.  Je n'ai rien cousu d'autre durant mes vacances, seulement ce petit napperon qu'on appelle "mug rug" en anglais, parce qu'il est juste assez grand pour accueillir un tasse et une petite collation.  Je l'ai fait en utilisant la méthode "English Paper Piecing", qui consiste à assembler tous les morceaux à la main, en utilisant des gabarits de papier comme support.  C'est un projet sur lequel j'ai travaillé lentement, assise au soleil sur le patio en matinée, ou à l'ombre dans l'après-midi, avec mon ami Gazou le chat étendu près de moi.


My hexagons are one inch long on each side, and all the fabrics I used for the front are japanese, a mix of tiny animal prints and dots.  I embroidered the dotted hexagons in way of quilting.  The binding is a Denyse Schmidt print from the Katie Jump Rope line.

Mes hexagones mesurent un pouce de côté, et tous les tissus que j'ai utilisés pour le dessus sont japonais, un mélange de petits imprimés d'animaux et de pois.  J'ai brodé les hexagones à pois en guise de matelassage.  Le biais tout autour est un imprimé de Denyse Schmidt tiré de sa collection Katie Jump Rope.


The back print is Who's Hoot by Michael Miller.  I wanted to keep the theme of tiny animal prints, and my boyfriend, for whom I made this mug rug, chose these owls.


Le tissu du revers est un imprimé qui s'appelle Who's Hoot, par Michael Miller.  Je voulais garder la thématique des petits imprimés d'animaux, et mon conjoint, à qui est destiné ce petit "mug rug", a choisi ces petits hiboux.


I still wanted to test it before giving it to Patrick, so I set myself up a little snack, but since I do not drink either  tea or coffee, I switched the mug for a glass of milk.  With homemade chocolate cookies, there is nothing better.  And the mug rug did just right.


J'ai voulu tester mon petit napperon avant de l'offrir à Patrick, alors je me suis préparé une petite collation.  Mais puisque je ne bois ni thé ni café, j'ai échangé la tasse du "mug rug" pour un verre de lait.  Avec des biscuits au chocolat faits maison, il n'y a rien de mieux.  Et je dois dire que le napperon a passé le test.

Sunday, 30 January 2011

Wanna Swap?


Karen from Sew Many Ways is having her first Swap Meet Weekend and I thought it might be fun to join in and see how it goes. What I have to offer is one full yard of Kaffe Fassett Rosette print, which I think is beautiful, but I bought it for one specific project and now it just doesn't fit with the other fabrics, so I would be happy to let it go to someone who could use it.  And just so you can check shipping fees, I am located in Quebec city, Canada.


What I would like to swap it for?  It could be either another Kaffe Fassett print or some Phillip Jacobs.  I am also collecting polka dot prints and vintage calico fabrics , and they don't have to be a full yard, they can be a bunch of nice scraps, since most of my projects are quite small.  So, don't be shy, let me know what you have to swap and we'll see if we can make a happy match!

Visit Karen here to join in the swap party!

Sylvie

Monday, 27 December 2010

The Final Cut

Remember my quilt top?  I finished it in August and four months later it still is just that.  A quilt top.  


I received a few weeks ago the fabric that I'll use as backing, pictured above, right, and seriously, I can't believe that it took me all these months to finally make a decision about this backing fabric.  I have been so fussy about it, and it could have kept going on, the hesitation, the constant "what if I find something better".

The only reason why I decided to buy this fabric now is that the store was down to 4 1/2 yards and I needed four.  I got scared that they would sell out and I'd be back to my starting point of having no idea what fabric to use.  Because this Valori Wells Del Hi Pom Pom was the only remaining option on my list.

I am still not convinced that it is the best match to my quilt top, but at least the fabric is gorgeous and bold enough to get some attention.

My plan when I received the fabric was to baste the quilt over that weekend and have it ready for hand quilting during the holidays.  However, as I write these lines, the fabric is still waiting, unwashed and uncut.

For my defense, I was working on Christmas presents at the time, and they had to be finished before the quilt.

Sunday, 19 December 2010

Fabric Basket Tutorial

Here is - finally! - a tutorial for my little FQ fabric basket.  The incredible response I've had to my giveaway has given me the small push I needed to sit down and write it.  So here it is, hopefully clear enough to be understood, but if anything is missing, please let me know and I will try to clarify.

FQ FABRIC BASKET TUTORIAL


Material needed:
Coordinated fabric scraps (fat eights work well for the sides)
Thin polyester batting (cotton and bamboo are not stiff enough)
Non-woven, heavy weight sew-on interfacing
Two yards of ribbon
Matching or contrasting thread
Vanishing-ink fabric marker
Plastic Ruler
Hand-sewing needle
Scissors
Rotary cutter (optional)
Cutting mat (optional)
Sewing machine (optional)

Cutting List:

From the outside fabric (here the black and green fabric)
2 pieces of 13" X 4" for long sides
2 pieces of 51/2" X 4" for short ends

From the inside fabric (here the green dots)
2 pieces of 13" X 4" for long sides
2 pieces of 51/2" X 4" for short ends

From the bottom fabric (here the floral)
2 pieces of 13" X 51/2"

From the batting:
2 pieces of 13" X 4"
2 pieces of 51/2" X 4"
1 piece of 13" X 51/2"

From the interfacing:
2 pieces of 13" X 4"
2 pieces of 51/2" X 4"
1 piece of 13" X 51/2"

From the ribbon:
8 pieces of 7" long


Once you have chosen your fabrics, iron each piece and cut according to cutting list above.  I have used two coordinated fat eights for the sides, but any scraps will do.  It would even be fun to have all different sides.

What you choose to use as batting and interfacing will determine the sturdiness of your basket.  I wanted a clean look, but I don't plan on moving this basket around much, sot extra sturdiness was not necessary.  I have tried different combinations and this light batting with the thick interfacing is what gave me the most satisfying result.  However, if you need something sturdier, inserting plastic canvas might be a better option.  In that case, you would need to leave larger openings when you sew around each side.

Step-by-step how-to


1.  As we have four layers for each four sides of the basket (inside fabric, batting, interfacing and outside fabric), we will quilt three of them together to give stability and add a little interest.  The quilting may be done differently than what I do, a simple cross pattern, but from experience I would recommend to avoid vertical or horizontal lines as they make a bend in the side of the basket and make it lose its shape.  So, this being said, take a small piece of the outside fabric, and using a ruler and a fabric marker, trace an X from corner to corner.  Repeat for the other small piece of outside fabric.  For the two long pieces of outside fabric, trace two Xs, from corner to middle of long side.


2.  Now what you need to do is a “sandwich” with one piece of batting, one piece of interfacing, and one piece of outside fabric on top, right side facing up.


3.  Quilt the three layers on the X that you have marked, either by machine or by hand.  Repeat for the three other sides.

4.  Now is time to add the inside fabric and the ribbons to the “sandwich”.  Place a quilted piece of outside fabric on your work table, outside fabric facing up.  Position two pieces of ribbon, one on either side, at 1” from the top.

5.  Then, lay the inside fabric over, wrong side facing up, and pin everything in place, making sure that the loose ends of ribbons will not get caught in the seam.


6.  Sew around the “sandwich”, leaving a 2” opening on the bottom side, i.e. the long side farther from the ribbons.  Clip corners.


7.  Turn right side out and repeat for all three other sides, and for the bottom part, omitting the ribbons on this last one.


8.  Iron flat all pieces and hand sew the openings.

9.  Now is time to assemble the sides to the bottom of the basket.  Place the bottom on your work table, inside up ( I chose the quilted side to be inside the basket, but you could choose otherwise, it won’t make much of a difference).  Take one side of your basket and lay it on the bottom piece, outside up, aligning the bottom sides of both pieces.  Pin in place.  Hand sew both pieces together.


10.  Repeat for other three sides.

11.  Tie the ribbons in the corners and you have a finished basket!

Sunday, 12 December 2010

It's Giveaway Day!

Thanks to Sew, Mama, Sew, Giveaway Day is back, and I wouldn't want to miss it, so I have prepared a little something to offer.

A while ago, I came up with a simple basket designed to store fat quarters.  I wanted to write a tutorial for this, but being the big procrastinator that I am, I never did.  However, I still want to share my little baskets with others, so I thought this giveaway might be a good opportunity to do so.

I will have two prizes:  one is the basket below, all sewed and ready to receive your fat quarters (or anything else you might want to store in it, it is up to you).


The other prize is a kit to sew your own basket, including all fabric pieces, batting and interfacing, as well as ribbon for the ties and a simple how-to.


If you want to enter my giveaway, here are the rules, which I have tried to keep as simple as possible:
  • Leave a comment on this post and let me know whether you want to be entered for the already-made basket or for the kit, or for the two of them.  If you don't mention which you want, I will assume you are in for both. 
  • Make sure I have a way to contact you.  If your profile is set up as no-reply, make sure you give your e-mail address in your comment.
  • Giveaway is open until Friday, December 17, midnight EST.
  • I will ship internationally, so everyone is welcome to enter.
  • Winners will be selected at random and will be annonced next weekend.
Best of luck to everyone!  

Sylvie